Cleaning Your Tracheostomy Inner Cannula and Skin
Important
Call 911 right away if you ever have trouble breathing.
Clean your trach tube and the skin around it at least once a day. Your health care provider may tell you to clean it more often. Regular cleaning of your trach tube:
-
Prevents skin irritation that can lead to infection around the stoma site.
-
Reduces the risk for respiratory infections.
-
Prevents buildup of dried secretions that can block the tracheostomy tube.
-
Reduces harm to the skin from secretions.
When cleaning your tracheostomy, it is important to be well prepared with the right supplies in case of an emergency. For example, have extra trach tubes, a manual ventilator bag, an obturator that fits your current trach tube, and a suctioning device with catheters available.
To clean your tracheostomy site and inner cannula, follow these steps and any other guidelines your provider gives you.
Step 1. Collect your supplies
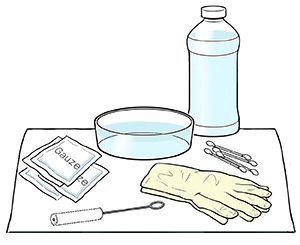
-
Choose a clean, well-lighted space near a sink and mirror. Collect your supplies:
-
Wash your hands with soap and clean, running water. Put on clean, disposable, powder-free gloves.
Step 2. Remove the inner cannula
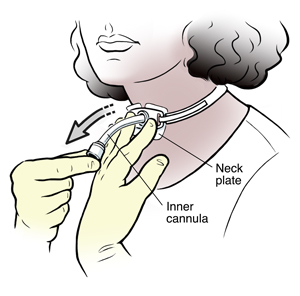
-
Hold the neck plate with one hand. With the other hand, unlock the inner tube (cannula). Gently remove the inner cannula. If you have trouble removing the inner cannula, do not force it. Contact your health care provider to find out what to do.
-
Do not remove the outer cannula.
-
Depending on your health history, your provider may tell you to insert a previously cleaned spare reusable inner cannula right away after removing the one in use and before going on to the cleaning step.
-
Your care team will teach you how to care for your inner cannula. Some inner cannulas are disposable but can be reused in certain situations. Some are not disposable. Follow your care team’s specific instructions.
Step 3. Clean the inner cannula
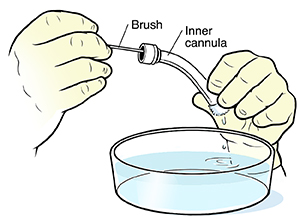
-
Place the inner cannula in the bowl of solution as instructed by your health care provider.
-
If you have a metal inner cannula, do not use hydrogen peroxide to clean it. It can damage the cannula. Use only normal saline in this case.
-
Clean the inner cannula with a trach tube brush. Do not use a toothbrush. Rinse it thoroughly with the solution as instructed by your provider. After it's clean, tap it gently against the inside edge of the sterile container to remove excess liquid and prevent aspiration. Don't dry the outer surface. A thin film of moisture acts as a lubricant during insertion.
-
If you have not already inserted a spare inner cannula, put the inner cannula back into the outer cannula. Lock the inner cannula in place.
Step 4. Clean your neck plate and skin
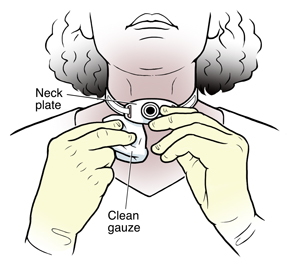
-
Remove the dressing from behind the neck plate. Look at the area to see if there is any skin breakdown or infection.
-
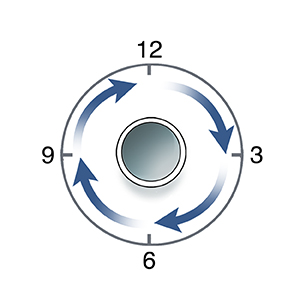
Clean the neck plate and the skin under it. Use clean gauze pads or other non-fraying material dabbed in the solution as instructed by your health care provider. One cleaning method involves cleaning the stoma in a step-wise fashion, one quarter at a time. Start at the 12 o'clock position, wiping to the 3 o'clock position. Then with a new gauze pad for each section, clean from 12 o'clock to 9 o'clock, followed by the 3 o'clock to 6 o'clock position. Last, clean from the 9 o'clock to 6 o'clock position. This pattern can be followed on the surrounding skin and tube flange. After cleaning, gently pat the skin dry.
-
You should not use a hydrogen peroxide mixture directly on your skin unless your provider specifically tells you to. Hydrogen peroxide can irritate the skin and increase the risk for infection. If you are told to use a hydrogen peroxide mixture on your skin, be sure to rinse the area as instructed afterward.
-
Put a dressing under the neck plate as instructed by your provider. This pad protects your skin. Don't cut a gauze pad. The frayed edges will increase the risk for infection, and a loose thread could potentially be inhaled into the trach.
Step 5. Changing the trach ties or soft collar
-
The neck plate is held in place with cloth ties or Velcro soft collar. When these become soiled, they should be changed. You will need another person to help you change the ties or soft collar and make sure the trach tube does not get displaced.
-
Your helper should first wash their hands. Then they should put on a pair of clean, disposable, powder-less gloves.
-
Have a clean set of ties or soft collar ready to be attached to the neck plate.
-
While one of you holds the neck plate in place, the other person loosens the ties or soft collar on the neck plate and removes them. Discard the soiled ties or soft collar with the rest of the used cleaning supplies.
-
While the neck plate is still being held in place, attach the clean ties or soft collar to the neck plate and secure them. Make sure the ties or soft collar are snug enough to keep the neck plate from moving too much, yet loose enough to be comfortable. You should be able to comfortably insert no more than one finger between the trach tie or soft collar and the skin.
Online Medical Reviewer:
Mary Mancini MD
Online Medical Reviewer:
Stacey Wojcik MBA BSN RN
Online Medical Reviewer:
Tara Novick BSN MSN
Date Last Reviewed:
3/1/2025
© 2000-2025 The StayWell Company, LLC. All rights reserved. This information is not intended as a substitute for professional medical care. Always follow your healthcare professional's instructions.